This morning I overheard on the monitor:
Matilda: "But my name starts with a M*A*T*I*L*D*A not a T*I*L*L*Y"
Matty: "and my name starts with a M*A*T*T*Y"
Matilda: “this is not right!”
Matilda: “MOMMY, my name is wrong”
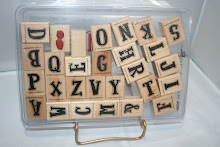
SO… she is finally realizing that her bedroom wall has letters that spell TILLY on it and not Matilda. I really like calling her Tilly, but she very much prefers Matilda. One time, we went to a birthday party in Georgia for a little boy named Will, whose grandma ran the preschool we went to. She had borrowed chairs and tables from the school and Matilda about had a conniption, because she did not want to sit in a chair that had a name that started with a “C” on it! Her chair should have an “M” on it! Ah, the joys of education! Guess I will have to change those letters so she won’t be so confused in the mornings!
Joel would not be happy at me for putting a pic on here but I can’t resist showing you guys this cute one I took of the girls in the bubbles the other night:

So this was the last month for Stamp Club. I will be starting a new one in April. Our technique for this month was an oldie but a goodie; and I just had to do it when I saw the new saleabration set, Polka Dot Punches. It really reminded me of the old tin pie safes, so I had to do some Faux Metal!
It is a very easy technique but you have to work fast. Here’s the card:

To make the cardstock look like metal, you cover a piece of cardstock with versamark or a matching color of embossing ink and then coat the paper with silver embossing powder. Tap off excess and heat it up. Then do a second layer of versamark and embossing powder, heating the middle up last. Before I do this second step I already have stamped my heart punch in the versamark ink and have it at the ready. As soon as I finish heating up the middle I put down the heat gun and immediately stamp the stamp in the hot middle. Warning..hold paper by the edges or with a tweezer so you don’t burn your fingers. The stamp stamps into the hot center leaving the impression. Easy peasy! Let dry for a couple of minutes and then punch out with your heart punch. I also punched out a few hearts from the scrap pieces of paper and used them as embellishments. Here is a picture by picture tutorial at splitcoast if you want to see each step:
http://www.splitcoaststampers.com/resources/tutorials/faux_metal/
Here is a tutorial for how to make the red eyelet square. http://paperpleasing.typepad.com/my_weblog/2009/02/eyelet-punch-tutorial-.html
I didn’t have enough red brads so I took some of my silver hodgepodge and put a dollop of crystal effects in the middle and some red chucky glitter to give it some red bling.
Hope your day is a great one!!!
Ciao for now! Deidre


1 comment:
Tell Matilda...I totally agree with her..how can she sit in a chair with a C on it??!!??!! LOL I agree...somtimes education does make our life a little harder...I can no longer spell words out I don't want my girls to know! LOL...Love love love the bath picture..that is tooo funny! oh...and your card is fabulous too! {SMILES}
Post a Comment